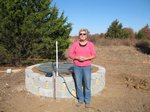
Freezeless Stock Tank

How to build a freezeless, offgrid stock tank (no electricity!)
Since we had no grid-supplied electricity at the farm the first winter cows were here I needed a way to keep the stock tank from freezing. After research on the web I came up with this idea. The overall logic included insulation and minimal exposure and evaporation I started with a 300 gal Rubbermaid stock tank. I designed it and built it literally all by myself (my husband had taught me how to lay block when we built his shop 20 years ago but he was in Georgia when I tackled this).Tools Required
- Wheelbarrow - to mix mortar in
- Hoe - to mix mortar with
- Level - at least 2'
- Trowel - to apply mortar
- Masonary hammer - to break blocks
Step 2: These are regular 12" block that I mortared in place. If the last block doesn't fit, you'll have to break one with a masonry hammer.
Step 3: Pack earth into the cavity between the tub and block (after the mortar has set). I also packed it into the block spaces. Fortunately I had some left-over dirt from where the septic pit was dug and transported it with the front-end loader of the tractor. This pic was taken after I had brushed the risidual dirt from the top of the block.
Step 4: Do the same thing with the second row
Step 5: Now lay the cap block and pack dirt to the bottom rim of the tub
Heck, this is all an experiment anyway.
Voila! For the top I couldn't decide which route to take: (1) go with a translucent cover so the sun's rays could shine thru during the day or (2) go with an insulated cover of some sort. I elected the translucent cover so what you see are just sheets of fiberglass that you get at the lumber yard. I laid each across the top of the tank where I wanted it to go and marked around the edge with a Sharpie then cut with a jigsaw. I left a small opening for the animals to drink from. The idea is to expose as small as space as possible. Then I screwed the pieces down. However I wasn't satisfied because these panels are flimsy and I thought about the weight of rain and snow. So I measured across in several places and had 3/8" rebar cut to lengths. Then I slid those under the "up-wave" part of the panel. I also bought some cans of expanding foam to finish filling in the gaps in the lower blocks. After it dried I sawed off any that extended beyond the blocks for a smoother appearance.
So how did it fare? Well wonderfully until the blizzard in January 2011. I made a point to spend the blizzard in the horse trailer to see how the tank (and the animals) fared. Long after the dog's water had frozen solid, the tank had no ice. However, as the temperature dropped into the lower teens some ice began to form. At 0 degrees ice finally formed about an 1 to 1 1/2" thick. It was easy to bust. I discovered that ice formed more easily when the water level was lower. In other words the more air could get between the cover and the surface of the water, the faster the evaporation and ice formed. When the water level was full it stayed fluid better. The other thing I tried was to keep the water moving by putting in a little solar fountain pump. However, the one I bought didn't move nearly enough water to work.
The next summer I talked to a Dow Corning engineer who assured me that their brand of true Styrofoam (actually it's blue) that is available in 4 x 8 sheets at building supply stores, will not degrade in water nor is it toxic to animals. It will degrade in ultraviolet light however. The next winter I cut the blue Styrofoam to fit inside the tub and nailed 4 layers inside marine-grade plywood cut to fit the outside rim of the tub. That worked as well as the translucent fiberglass.


